Monday, March 4, 2013

Kitchen - Prime it up!


Here it is with primer.  Not very interesting yet.

But we can't quit yet.  The deadline we're working for is the countertop "measurer" is coming on March 7.   We have to have the base cabinets in by then so he can measure.

Now for the wood floor.

At this point, I confess that we've been working all too hard - mostly 10-11 hour days.  I'm ready to get to the point that I/we can slow down.

Thursday, February 28, 2013

Kitchen - sheetrock, mudding, and taping, WHEW!

Hanging and finishing the sheetrock took me from Bob's non-birthday on 2/28 until March 3.  Part of that was any area that matched "old" wall finish needed two layers of 1/2 inch sheetrock.  That meant that the exposed ceiling took two layers, as well as the dining room wall.

Also, we've learned through previous grave errors, that the sheetrock finish is one of the most important factors in enjoying what you've done for many years to come.  So I'll just give you some pictures to lead you through.


I used 5/8" rock for the cinder block walls.  I thought that would keep the walls straighter.


All rock hung, and first tape job.  Luckily, on a kitchen, you don't have to spend too much time behind wall and base cabinets.


Second coat of mud.  Because of the time crunch, I had to use chemically dried mud - which I don't like much - you have to keep mixing and washing, mixing and washing, ad nauseum.


Third coat.  I was most concerned with the ceiling.  Someone had tried to patch it when paint bubbled and it didn't work very well.  The only way that I could figure out how to make it come out well was to overlay the whole thing with 1/4" sheet rock.  But it was still wavy and problematic.  No good having a brand new kitchen with a lousy ceiling! 


I spent quite a while on the ceiling, and it turned out reasonably well.  Plus, it's nice because kitchen lighting points down.  If we had a chandelier or some lighting that points up, I would have touched it up even further.

Just about the last coat, and we're ready to sand and prime.


Sanding is my favorite job.  NOT.  Looks like the mask worked OK.

Wednesday, February 27, 2013

Kitchen - get ready before you go: ceiling sheetrock wiring, and blocking

In any project, it's always get ready to get ready to actually make some definite progress.  There's nothing more I'd like to do than throw up some sheetrock and get out of the dirt, but . . .

I've goofed up before by not making sure the wall cabinets have something to screw to.  So I need to make sure there's backing for all the cabinets.   Since most is cinder block wall, that means drilling and screwing using "tapcon" screws.  Luckily they work pretty well - AND - and this is important, BUY A HAMMER DRILL.  I got mine at Home Depot for $80 or so, and it is well worth it.  From my point of view, it's a necessity for drilling in concrete and concrete block.

I also ran low voltage wires for the undercounter LED lighting.  I'm excited about that.  We really like undercounter lighting and the new LED stuff looks great to me - narrow ribbons to install and not hot like other undercounter lights I've installed.


Here we are all blocked (the light colored wood is the most recent) for the wall cabinets and the range hood.  You can see the low voltage wire (I used good speaker wire, I hope it's OK!!!) in the lower middle  of the picture hanging down from the metal protective plate (so I don't drive a sheet rock screw through the wire).


Same thing on the other wall.  I think we're ready to wrap it up in gypsum and make it look like a real room.

Tuesday, February 26, 2013

Kitchen - Stove vent hood ductwork

The last major task before putting up sheet rock was to run the ducting for the stove hood.  Up until now, there was a fan in the ceiling that vented into the attic - not a good idea - nor does it follow code.

 Fortunately, or unfortunately in this case, we have hip tile roof.  This meant that I couldn't run the duct straight up through the roof without breaking up tile.  Nor could I run it out a gable since there wasn't one.  I decided to go up and over the garage and then under the eave - about 12 feet.

I knew it was going to take most all day - getting parts at the store and figuring out where it was going to come out the eave, and then cutting parts to fit - if they would.  I got a bit lucky by finding a way to put together 2 three foot lengths of 3 1/2 by 10 inch ducting with a 90 degree angle and sliding the whole rig through the eave.  It was just long enough that I could crawl up in the attic and reach it to fasten the next lengths of pipe.

If you look under the black wire, you can see the rectangular duct ready for me to crawl back there and attach another piece.  Doesn't it look fun with all kinds of room?  This part of the attic over the garage doesn't have insulation, so it could have been worse.


Again, I was lucky because I had just enough space to crawl up through when I ripped out the old soffit.  I didn't have to crawl 25 feet from the crawl space entry just to get there.  The picture on the left shows where I crawl up and where the stove will be someday.

Anyway, it worked.  I didn't find a cover for the eave that looked nice, but I stapled screening over it for now.  It's ugly though, and I'll need to get back to it someday.

Monday, February 25, 2013

Kitchen? Maybe kind of.

Bob and I took off on 2/24.  Took a bike ride and goofed off.  We did go to Home Depot for a few things and a sheet of 3/4 plywood that's a lot easier to handle with 2 people.

But on the 25th, it was time to get a little done. 


 First, Bob and I replaced the washer and dryer.  Not only that, we cleaned the water filters and actually leveled the washer.  Novel concepts.


I ripped up the rest of the original 1 by 6 inch flooring and took advantage one last time of getting under the house easily.  We laid 6 mil plastic down and it looked and felt pretty nice with new sewer lines, new water lines, and nice clean plastic to keep the moisture and any odor down.


See how nice it looks under there?

Bob also helped me replace a joist that was sticking up too far.  I put in a few sister partial joists so that the plywood was reasonably flat and level.

After Bob and Glenda took off back to Alaska, ML and I glued and screwed down most of the plywood.

Now maybe I could really work on the kitchen!

Sunday, February 24, 2013

Kitchen? - Back to work for me and ML

Richie and Homey were back for phase two of the sewer gas problem.  They were back at the crawlspace entrance and the two bathrooms.  There was a small leak in the cast iron trunk line where the two toilet pipes came together.  They had to take up the toilets and replace the cast iron from there to the pipe going out toward the main line.  Therefore, the kitchen was open for business.


Not so fast!  Richie gave me the idea to replace an old galvanized water pipe that went under the slab by putting the new line in the sewer pipe trench.  I couldn't pass that up so I went to the store for parts. 

The picture showed the "new water main" that is the yellower plastic.  The old galvanized pipe leading to the right goes to the sink.  The hot water had already been replaced.  The other galvanized pipe goes to the hot water heater and laundry room.


Now the smaller white pipe goes to the kitchen sink and the bigger one leads to the trench through the garage.

The funny thing was that I stubbed it off in the laundry room and I was all proud of what we had done.  Plus, I was looking forward to a nice hot shower after all the crawling around in the sand and dirt under the house.

OOOOPS!  There still wasn't a connection to the water heater!  That shower was COLD.


Saturday, February 23, 2013

Garage - concrete fills the trough.

Whew.  ML is off the hook for concrete help.  Bob and Glenda showed up in the middle of the afternoon.  I was a bit frustrated.  The plumbing hookup from the new waterline to the hot water heater and to the cold water laundry outlet and also to an outside hose barb should have taken an hour - and I think I was in my 4th hour and two trips to the store.  Plus, I really didn't want Bob and Glenda to have to visit without hot water. . .


You can see the new waterline in this picture, but it's just stubbed off on the back wall.  I didn't get a picture of the new arrangement.  I think I was too pissed off to remember to take a picture.


But fortunately, as usual, Bob arrived and bailed me out of my funk and got things going.


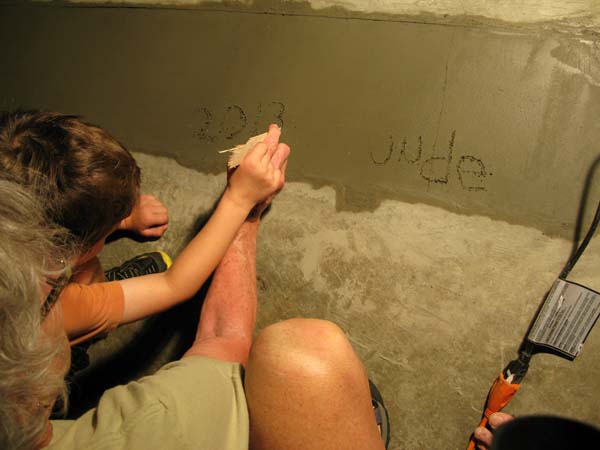
Before I knew it, we had the sacrete premix all mixed up, the trench filled in, and a nice smooth finish on it.


The only thing left was for Jude to write his name in the concrete - with Grandma's help.  


I think they had fun.  And I had fun thinking that we could get the washer and dryer back in place and use the garage again - and I could actually start work on the kitchen.